Using the AeroPress
In my last blog, I outlined the inexpensive equipment that you would need to make your first cup of “good” coffee. If you recall, I started this blog to help my friends avoid the mistakes I made both in purchasing and brewing when I began my coffee adventure. I want you to benefit from my experience and research.
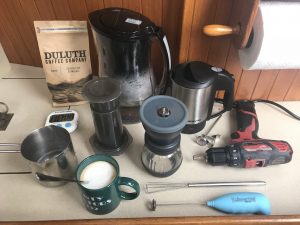
So….it’s time now to become friends with your new AeroPress (AP). I found the AP when I was looking for ways to make good coffee (without electricity) on our sailboat. The AP quickly found its way into our home, where it’s been my device of choice every morning for almost 2 years. It’s cheap, well-proven, doesn’t require electricity, forgiving of mistakes, quick, and easy to clean.
Start with the original AP method and recipe. Here’s some pretty basic information:
Personally, I currently use two basic recipes. Use the one the fits your tastes. Or try both!
#1 QUASI-ESPRESSO: I like my coffee strong. The AP cannot make espresso, no matter what you are told. It can make strong, espresso-like coffee. Here’s how:
- Add 3 AP scoops (about 50g) ground coffee. If you’re grinding your own, medium grind.
- Fill the AP with 185°F (85°C) water (about 200 ml).
- Press for 20-30 seconds, until all the water is pressed through the coffee.
- Enjoy!
- FYI- the coffee:water ratio is about 1:4.
#2 AMERICANO: My wife likes lattes. In the next blog, we discuss milk-coffee drinks. For now, try it black, like an Americano:
- Add 1.5 AP scoops (about 25g) ground coffee. If you’re grinding your own, medium grind.
- Fill the AP a bit more than 1/2 full with 185°F (85°C) water (about 100 ml).
- Press for 20-30 seconds, until all the water is pressed through the coffee.
- After pressing, add the remaining water (about 100 ml). Total water is about 200ml (200g). You may add more (or less) water to your taste.
- Enjoy!
- FYI- the coffee:water ratio is about 1:8.
Extraction tip:
If you want less strong coffee, add water after you brew. Note that the two recipes use the same amount of water in the end. But for the Americano, the amount of water and coffee grounds are cut in half for brewing. It’s important to use the right amount of water when you press your coffee. When pressing, too little water will make your coffee taste bitter (under-extracted); too much, weak and sour (over-extracted). Fortunately, the AP is so forgiving that you might be able to get by not following this tip.
Start with the original method (not inverted). I use an inverted method, but I did not for the first year or so. I will discuss the pros and cons of each method in a future blog. For now, if you’re curious, here is a good video about the inverted method (using a metal filter): https://youtu.be/Ugj5OONvGZQ Perhaps in the future, I’ll make my own videos….
So…how was your first hand-crafted single-serve coffee? Leave your comments below.
Next
We’ll dive into how to froth milk for your coffee drink! This is one way I keep my wife happy. 🙂